
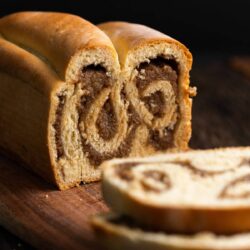
Povitica Bread is a delightful fusion of tradition and surprise. This “nut roll” has captivating swirls in each layer. Unravel the walnut-filled elegance in every delectable bite.
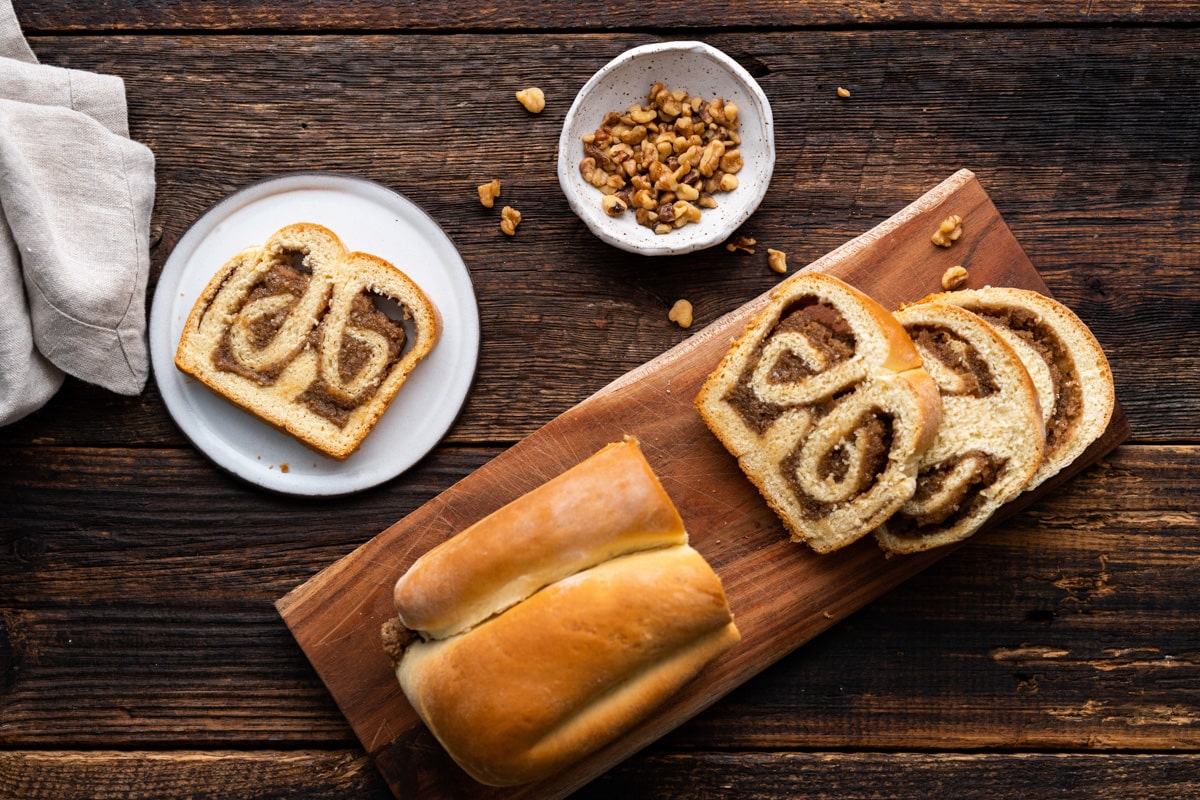
You guys, this bread is addictive! I first tried it while visiting friends in Kansas City. If you live nearby or ever visit, you have to go to Strawberry Hill. They’ve been there since 1903, baking authentic Povitica in all flavors! Once I tried it, I knew I needed to create a recipe. The bread is soft and fluffy, with a crisp outer shell, and the filling is sweet, melting in your mouth with each bite.
One thing I’m trying to do more is make bread! I love eating it (I mean, who doesn’t?), but I want to get better at making it from scratch. If you’re interested too, I recommend trying my Pan de Agua recipe first; it’s a great starter bread. However, if you’re feeling ambitious, give this Povitica recipe a go!
If you’re a bread connoisseur, in addition to this Povitica recipe, you must also try my Easy Rustic Olive Bread, Lemon Poppy Seed Summer Squash Bread, and Honey and Herb Bread!
Table of Contents
History of Povitica Bread
Povitica Bread, also known as Potica, is a traditional Eastern European sweet bread. Its origin traces back to the early 20th century in Slovenia and Croatia, among other regions of Central Europe. Povitica Bread, named after the Slovenian word poviti meaning “to wrap” or “to roll,” is a traditional Eastern European sweet bread. Characterized by its distinctive swirls of rich, nutty filling wrapped in thin, sweet yeast dough, Povitica is a symbol of celebration, often prepared for holidays and special occasions. This bread showcases a unique rolling technique that results in its iconic spiral layers. Over time, Povitica has become a cherished heritage recipe. It reflects the cultural and culinary traditions of the communities where it originated.
Reasons to Love This Bread
- The stunning swirls in every slice make Povitica a visual feast that captivates your eyes and your taste buds.
- Loaded with sweet, nutty fillings, Povitica offers a burst of rich, indulgent flavors.
- Perfect for breakfast, dessert, or as a special snack, Povitica Bread is a versatile treat that makes it a favorite for any occasion.
Recipe Ingredients

- Walnuts: Offer a delightful crunch and earthy flavor, contrasting with the bread’s softness and enriching the filling.
- Butter: Ensures a tender crumb and adds a creamy taste that’s fundamental to Povitica’s indulgent character.
- Sugar: Provides sweetness to balance the savory notes of the bread and complement the filling’s flavors.
- Cinnamon: Adds a warm, spicy note, which is a signature taste in the Povitica filling.
- Vanilla Extract: Gives a subtle floral essence that elevates the overall flavor profile of the bread.
See the recipe card for full information on ingredients and quantities.
Variations
- Almond Milk for Whole Milk: Swap whole milk with almond milk for a slightly nuttier, dairy-free alternative.
- Brown Sugar for Granulated Sugar: Use brown sugar in place of granulated sugar to add a hint of caramel-like sweetness to both the dough and the filling.
- Pecans for Walnuts: Substitute walnuts with pecans in the filling for a similar texture and a subtly different nutty taste.
- Margarine for Butter: Replace butter with margarine in both the dough and filling for a dairy-free option.
How to Make Povitica
Step #1: In a small bowl, whisk together the warm water, ½ teaspoon of sugar, and yeast. Set aside for 5 minutes until it becomes foamy.

Step #2: In a medium saucepan, heat the milk to just below boiling (about 3-5 minutes), stirring occasionally. Then set it aside to cool.

Step #3: After the warm milk has cooled, whisk in the melted butter, 3 tablespoons of sugar, and salt.
Step #4: Next, add the large egg, vanilla, and yeast mixture to the milk and whisk together.

Step #5: In the large bowl of a freestanding mixer with a dough hook, add the flour. Then, pour the wet ingredients into the bowl with the flour and mix with the dough hook until it forms a smooth ball of dough.

Step #6: Place the dough on a lightly floured surface, shaping it into a ball. After that, transfer it to a lightly oiled bowl and cover with a warm tea towel. Allow it to rise for 1 hour and 30 minutes.

Step #7: While the dough is rising, make the filling. In a bowl of a food processor or blender, add the milk and butter and pulse together until well-mixed. Next, add the walnuts, sugar, salt, and cinnamon and pulse together until you combine everything.

Step #8: Then, add the vanilla and egg yolk and pulse until the filling is well combined. Keep the mixture at room temperature until you are ready to spread it onto the dough.
Step #9: Spray a 9×5 loaf pan with non-stick cooking spray and set it aside. Roll out the dough to roughly 20” x 8” in size. Ensure the dough isn’t too thin so you can add the filling and roll it without issue.
Step #10: Spread the filling over the rolled-out dough. Ensure a 1/2-inch border along the edges of the dough to prevent the filling from squeezing out as you roll it up.

Step #11: Roll the long side of the dough as tightly as possible, as if creating a rope.

Step #12: Gently stretch out the rope so that it fits in your greased loaf pan in an S shape. Then, cover the loaf pan with a warm, damp towel and let it sit in a warm place for 15 minutes. Simultaneously, preheat your oven to 350 degrees Fahrenheit (177 degrees Celsius).

Step #13: Bake for 15 minutes at 350 degrees Fahrenheit (177 degrees Celsius), then lower the oven temperature to 300 degrees Fahrenheit (149 degrees Celsius). Bake for another 45 minutes.
Step #14: After 30 minutes of cooking (15 at 350 and 15 at 300 Fahrenheit; 177 and 149 Celsius), if the loaf starts to turn brown, cover it with aluminum foil for the remainder of the baking time.
Step #15: Remove the pan from the oven and allow it to cool for 30 minutes. You can tap it, and it should sound hollow, indicating it’s done.

Finally, slice and enjoy!

Expert Tips
- Dough Consistency: Aim for a smooth and elastic dough. Knead thoroughly until the dough is no longer sticky and has a uniform texture.
- Stretching Technique: By using the backs of your hands, gently stretch the dough from the center.
- Generous Filling Application: Don’t skimp on the filling. A generous amount creates rich flavor and distinctive swirls.
- Tight Rolling Technique: Roll the dough tightly to prevent air pockets and to ensure that the filling is evenly distributed in every slice. Aim for a little thinner and translucent layer where you can see the sheet through the dough. Once you achieve the desired thinness, carefully lift the sheet and roll the dough tightly, similar to a Swiss roll.

Frequently Asked Questions
Yes, for a glossy finish, lightly brush the top of the Povitica with egg wash before baking. This helps achieve a beautiful golden brown crust.
Transfer the baked Povitica to a wire rack to cool. This prevents the bottom from becoming soggy and maintains the crust’s texture.
Absolutely! Cocoa powder can be added to the traditional walnut filling for a chocolatey twist, enhancing the flavor.
Apart from walnuts, you can experiment with almonds, poppy seeds, or even a sweet cheese filling, offering a delightful range of flavors.
Storage Info
Povitica Bread can be stored at room temperature, wrapped in plastic or aluminum foil, for up to 3-5 days. For longer storage, it freezes well; just wrap it tightly and freeze for up to 3 months. To thaw, leave it at room temperature or in the refrigerator overnight. You can reheat Povitica by wrapping it in foil and warming it in a preheated oven at 350 degrees Fahrenheit (175 degrees Celsius) for about 10-15 minutes, ensuring it regains its softness and warmth.
More Bread Recipes to Love
- Easy Brazilian Cheese Bread (Pão de Queijo)
- Savory Irish Soda Bread
- Indian Naan Bread
- Classic Rosemary Focaccia
- Spiced Pear and Pistachio Bread
- Rosemary and Red Onion Focaccia
Authentic Povitica Recipe
RECOMMENDED PRODUCTS
Ingredients
For the Dough
- 2 tsp active dry yeast
- 1/2 tsp granulated sugar
- 2 Tbsp warm water
- 1/2 cup whole milk
- 3 Tbsp granulated sugar
- 3/4 tsp salt
- 1 Tbsp butter - melted
- 1 egg
- 1/4 tsp vanilla extract
- 2 1/4 cups all-purpose flour
For the Filling
- 1/4 cup butter - melted
- 1/4 cup whole milk
- 1 3/4 cups walnuts
- 1/2 cup granulated sugar
- 1/4 tsp salt
- 1/2 tsp ground cinnamon
- 1 egg yolk
- 1/2 tsp vanilla extract
Instructions
- In a small bowl, whisk together the warm water, ½ teaspoon of sugar, and yeast. Set aside for 5 minutes until it becomes foamy.
- In a medium saucepan, heat the milk to just below boiling (about 3-5 minutes), stirring occasionally. Then set it aside to cool.
- After the warm milk has cooled, whisk in the melted butter, 3 tablespoons of sugar, and salt.
- Next, add the large egg, vanilla, and yeast mixture to the milk and whisk together.
- In the large bowl of a freestanding mixer with a dough hook, add the flour. Then, pour the wet ingredients into the bowl with the flour and mix with the dough hook until it forms a smooth ball of dough.
- Place the dough on a lightly floured surface, shaping it into a ball. After that, transfer it to a lightly oiled bowl and cover with a warm tea towel. Allow it to rise for 1 hour and 30 minutes.
- While the dough is rising, make the filling. In a bowl of a food processor or blender, add the milk and butter and pulse together until well-mixed. Next, add the walnuts, sugar, salt, and cinnamon and pulse together until you combine everything.
- Then, add the vanilla and egg yolk and pulse until the filling is well combined. Keep the mixture at room temperature until you are ready to spread it onto the dough.
- Spray a 9×5 loaf pan with non-stick cooking spray and set it aside. Roll out the dough to roughly 20” x 8” in size. Ensure the dough isn't too thin so you can add the filling and roll it without issue.
- Spread the filling over the rolled-out dough. Ensure a 1/2-inch border along the edges of the dough to prevent the filling from squeezing out as you roll it up.
- Roll the long side of the dough as tightly as possible, as if creating a rope.
- Gently stretch out the rope so that it fits in your greased loaf pan in an S shape. Then, cover the loaf pan with a warm, damp towel and let it sit in a warm place for 15 minutes. Simultaneously, preheat your oven to 350 degrees Fahrenheit (177 degrees Celsius).
- Bake for 15 minutes at 350 degrees Fahrenheit (177 degrees Celsius), then lower the oven temperature to 300 degrees Fahrenheit (149 degrees Celsius). Bake for another 45 minutes.
- After 30 minutes of cooking (15 at 350 and 15 at 300 Fahrenheit; 177 and 149 Celsius), if the loaf starts to turn brown, cover it with aluminum foil for the remainder of the baking time.
- Remove the pan from the oven and allow it to cool for 30 minutes. You can tap it, and it should sound hollow, indicating it’s done.
- Finally, slice and enjoy!


Tried this for the first time, and it came out beautifully. Love the rich filling!
This is Not how you make this bread! You got it all wrong. I’ve been making this for over 50 years started with my grandmother who learned it from her grandmother so over 150 year old recipe.the dough is pretty close but should be mixed by hand & stretched by hand thin so you can almost see trough it & as big an average round kitchen table. The filling is all wrong first you put two cubes of butter in a large nonstick pan bring to a boil then add 4 cups ground black walnuts & cook 5 min add 2 cans sweetened condensed milk boil 10 min add 1cup sugar & boil 10min constantly stirring then add tsp cinnamon & 2 eggs beaten stirring fast cause eggs will instantly cook keep slightly boiling 10 more min then cool to room temperature. My grandmother had a old cotton sheet used for the log making. She floured the sheet then stretched the dough out on the sheet, spread the filling on thin or thick depending on how gooey of bread you want, leave 1″ on edge to fold in then start the roll once you have a turn or two grab the sheet and lift! The roll will make itself. The baking part is about the same except 15 min before done brush with beatin egg. Sorry if I come across as having an attitude but this is the authentic way to make this bread try it & I promise you will never go back to your way.
Hi James, thanks for sharing your recipe. It sounds delicious.