
Cool down and satisfy your sweet tooth with this Homemade Waffle Ice Cream Sandwich. They’re a fun, customizable dessert, combining crisp waffles with your choice of ice cream and toppings.

Get ready to elevate your dessert game with the delightful magic of Homemade Waffle Ice Cream Sandwiches! It’s the perfect fusion of crispy, homemade waffles, hugging a generous scoop of your favorite ice cream. Create the flavor explosion that’ll transport you straight to dessert heaven!
It’s a hands-on, customizable treat – play around with different ice cream flavors and toppings, and even experiment with the waffle thickness. So, why settle for ordinary when you can sandwich your happiness between two homemade waffles? Let the tasty adventure begin!
Table of Contents
Reasons to Love These Ice Cream Sandwiches
- Mix and match different waffle and ice cream flavors for endless tasty combinations.
- The crispy waffle contrasts beautifully with the creamy ice cream.
- It’s perfect for summer and a refreshing treat to beat the heat on hot summer days.
- Making these sandwiches is fun to make and an engaging activity for all ages.
- Homemade Ice Cream Waffle Sandwiches are ideal for those who love a sweet and indulgent treat.
Recipe Ingredients

- All-Purpose Flour: Flour is essential for the waffle batter structure.
- Eggs: Bind the waffle ingredients and provide texture.
- Milk: Adds moisture and richness to the waffle batter.
- Vegetable Oil: Ensures the waffles are tender and not too dry.
- Your Favorite Ice Cream Flavor: The key component for the sandwich filling.
See the recipe card for full information on ingredients and quantities.
Variations
- Chocolate Chip Batter: Stir a cup of chocolate chips into the waffle batter. The chips add a delightful chocolate flavor that pairs excellently with homemade ice cream sandwiches.
- Nutty Addition: Mix in finely chopped nuts such as almonds or pecans into the batter. This adds a subtle nutty flavor and an enjoyable crunch.
- Ice Cream Variety: Alternate between vanilla ice cream, chocolate ice cream, and strawberry ice cream for the filling. Each flavor offers a distinct taste experience.
- Drizzle Finishing: Drizzle the top of the assembled sandwich with chocolate syrup, caramel, or berry sauce.
- Sprinkles as Toppings: Garnish the sides of the ice cream layer with colorful sprinkles. This adds a fun and festive look to the sandwiches.
How To Make Homemade Waffle Ice Cream Sandwiches
Step #1: Whisk eggs in a large bowl until fluffy (you can either hand mix or use a mixer).
Step #2: Add the dry ingredients: flour, sugar, baking powder, and salt. Then, add the vanilla, milk, and vegetable oil. Mix until smooth.
Step #3: Preheat your regular waffle iron. You can use a Belgian waffle iron, but we have found that Belgian waffles make these ice cream sandwiches too bready and not as good as a regular waffle, which is thinner and crisper).
Step #4: Spray the preheated waffle iron with non-stick cooking spray.
Step #5: Pour the appropriate amount of batter into your waffle maker and cook to your desired crispiness or until golden brown.
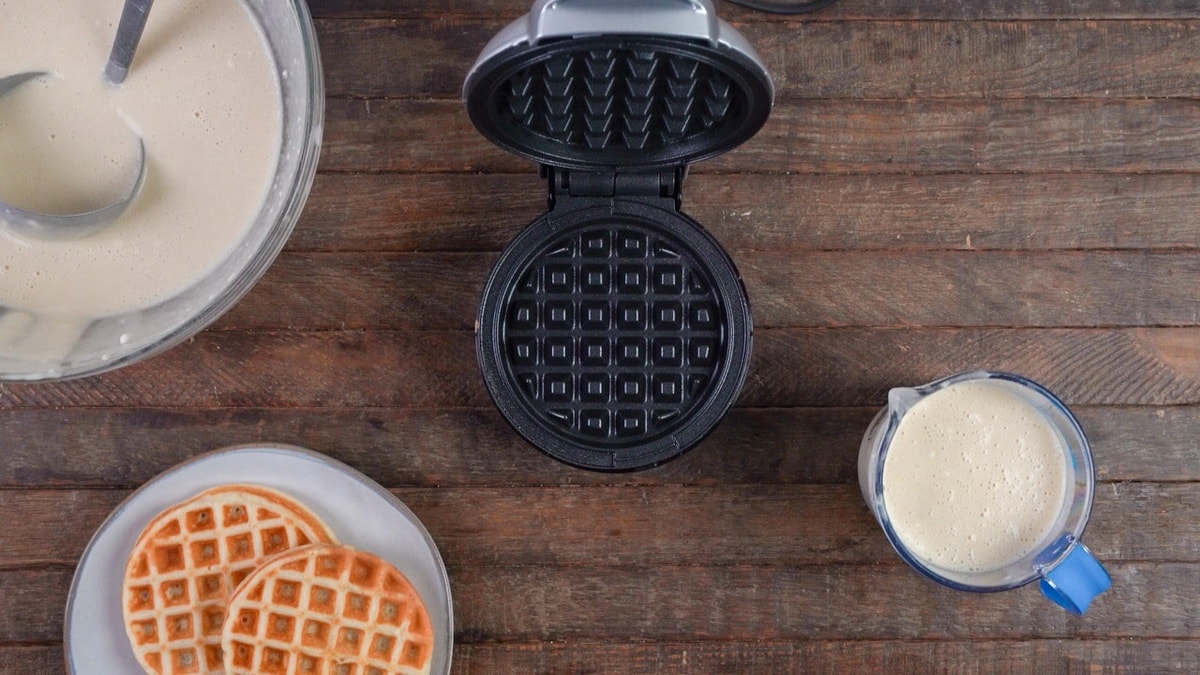
Step #6: Set the cooked waffles aside to cool to room temperature. To make the perfect-sized waffles, I recommend this inexpensive mini waffle iron on Amazon. However, if you have a larger waffle iron, you can always use that and then cut the waffles to the desired sandwich size.
Step #7: Take two waffles and add ¾ cup of your favorite ice cream onto one waffle. Place the other waffle on top and gently press down until the ice cream is evenly distributed between the waffles. Then, garnish the outside with your desired toppings.

Step #8: After you have created your desired Waffle Ice Cream Sandwich, place a piece of parchment paper on a plate and transfer it to the freezer for the ice cream to firm, about 10-15 minutes.

Step #9: After the ice cream has firmed, serve and enjoy!

Waffle Sandwich Combination That We Love
Chocolate Covered Strawberry
We used strawberry ice cream between our waffle sandwich and drizzled melted milk chocolate over the top.

Turtle
This is our take on the classic Turtle candy, with chocolate ice cream dipped in creamy caramel sauce and topped with pecans.

Mint Chocolate Chip
Since mint chocolate chip is my favorite ice cream, I had to make a sandwich with it and added extra chocolate by covering the outside with mini semi-sweet chocolate chips.

Classic Jimmy Sandwich
If you want to stick with the classics, you can never go wrong with vanilla ice cream and colorful jimmies all around.

I even made one with the Red, White, and Blue jimmies, which would be perfect for the 4th of July holiday in the USA!

Expert Tips
- Avoid Overmixing the Batter: Mix just until the ingredients are combined to prevent tough waffles.
- Use a Scoop for Consistent Size: Consistent waffle sizes make assembling the sandwiches easier and more uniform.
- Let Waffles Cool: Allow waffles to cool to room temperature before assembling to prevent ice cream from melting too quickly.
- Soften Ice Cream Slightly: Soften the ice cream just a bit for easier scooping and spreading.
- Freeze Waffles Briefly Before Assembling: A quick freeze of the waffles makes them sturdier for handling the ice cream.
Frequently Asked Questions
Waffles are ideally cooked when they have a golden brown color and a crisp exterior. This usually takes about 4-5 minutes in a preheated waffle iron, but the exact time may vary depending on your waffle maker.
Cooling the waffles to room temperature is crucial because if they are too warm, they will cause the ice cream to melt rapidly during assembly, creating a mess and making the sandwiches difficult to handle.
A good rule of thumb is to use about ¾ cup of ice cream for each sandwich. This amount provides a satisfying layer of ice cream that complements the waffle.
First, ensure your waffle iron is properly preheated. Then, lightly coat it with non-stick cooking spray or a small amount of butter before adding the batter. This will help in releasing the waffles easily once they are cooked.
Yes, store-bought waffles are a convenient alternative. However, they might not be as crisp as homemade ones. Toast them slightly before assembly for a better texture.
Storage Info
To store Homemade Waffle Ice Cream Sandwiches, keep them in the freezer for up to 1 month. Individually wrap each sandwich in plastic wrap or parchment paper, then place them in an airtight container or a freezer bag for optimal storage. Using a freezer bag can help conserve space and protect the sandwiches from freezer burn.
More Delicious Recipes That You Will Love

Homemade Waffle Ice Cream Sandwiches Recipe
RECOMMENDED PRODUCTS
Ingredients
For the Batter
- 2 large eggs
- 2 Cups All Purpose Flour
- 1 3/4 cup milk
- 1/2 cup vegetable oil
- 2 tablespoons white sugar
- 4 teaspoons baking powder
- 1/4 teaspoon salt
- 1 teaspoon vanilla extract
For the Sandwiches
- 6 cups of your favorite ice cream
- Your favorite ice cream toppings
Instructions
- Whisk eggs in a large bowl until fluffy (you can either hand mix or use a mixer).
- Add the dry ingredients: flour, sugar, baking powder, and salt. Then, add the vanilla, milk, and vegetable oil. Mix until smooth.
- Preheat your regular waffle iron. You can use a Belgian waffle iron, but we have found that Belgian waffles make these ice cream sandwiches too bready and not as good as a regular waffle, which is thinner and crisper).
- Spray the preheated waffle iron with non-stick cooking spray.
- Pour the appropriate amount of batter into your waffle maker and cook to your desired crispiness or until golden brown.
- Set the cooked waffles aside to cool to room temperature. To make the perfect-sized waffles, I recommend this inexpensive mini waffle iron on Amazon. However, if you have a larger waffle iron, you can always use that and then cut the waffles to the desired sandwich size.
- Take two waffles and add ¾ cup of your favorite ice cream onto one waffle. Place the other waffle on top and gently press down until the ice cream is evenly distributed between the waffles. Then, garnish the outside with your desired toppings.
- After you have created your desired Waffle Ice Cream Sandwich, place a piece of parchment paper on a plate and transfer it to the freezer for the ice cream to firm, about 10-15 minutes.
- After the ice cream has firmed, serve and enjoy!


Such a fun treat to make with the kids and they loved picking their own ice cream flavors.